In this article, we’re going to look further at improving the sound of the low end in your productions. In particular, we are going to delve into EQ, one of the most important tools available to the producer, and look at basic mixing using parametric EQ. We recommend reading part 1 first if you haven’t yet done so – you can find it here.
EQ is the abbreviation of Equalisation and comes from the early 20th century when the tone of the human voice over a telegraph or telephone needed to be ‘equalised’. Now it refers to a control to change the tone of audio: specifically, it’s a filter that is able to cut or boost a particular section or frequency range of the audio spectrum. The bass and treble controls on a car stereo are a basic EQ (called a ‘shelving EQ) which allows you to boost at fixed frequencies either the ‘low end’ of the musical spectrum – the bass, or the ‘top end’ – the treble. The EQ available to producers, however, splits the audio spectrum up into much smaller sections than simply bass and treble and allows for far more precision and control than simply boosting.
The full human auditory spectrum, from the very lowest sounds that you can only really ‘feel’ rather than hear and up to the highest sounds that a human can perceive, is in the range of around 20Hz up to around 20kHz. All the sounds and samples you’ll be using in your productions will sit somewhere within this spectrum. The producer’s job is to get all the sounds to work as they want it to – to either cut through the mix, or sit quietly in the background, and to work with all the other sounds. EQ will be one of the main tools in this job, and you will grow to love your trusty EQs once you learn what they can do.
Two Golden Rules
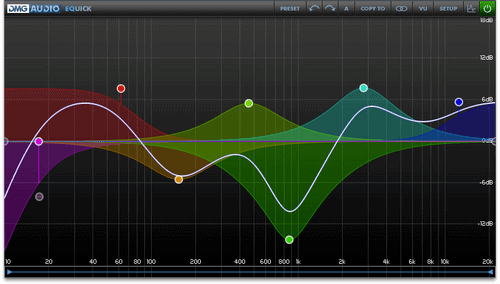
There are a number of different types of EQ but when you’re working in a DAW, it’s likely that you’ll be using a parametric EQ. Parametric EQ allows you to select the frequency, bandwidth and gain. It’s the producer’s go-to tool to fix all sorts of production challenges. Need a little more slap from the congas? Too much sizzle on the hi-hats? A bit too much boom but not enough thud in the kick drum? These are all things that can be tackled using your EQ. But! …there are two golden rules to remember:
- Always try to fix the problem at the source first – EQ is a wonderful tool, but before you reach for the gain control, it’s worth checking to see if you’ve chosen an appropriate sound.
- If you’re happy with the sound choice then it’s almost always preferable, at least in the first instance, to cut the EQ rather than boost.
You can think of creating a well-mixed track like creating a sonic jigsaw. Each sound – a beat, a loop, a bass line, a sample or a vocal – needs to fit neatly with all the others to create the whole. Putting a mix together can involve sculpting out spaces in the frequency spectrum for each part to sit in, depending on the complexity of the track in question, and your sound sources, amongst other things. You can ‘sculpt’ this space by using EQ to remove parts of the audio spectrum that are un-needed, and that are getting in the way of other parts or bussed groups of parts. It’s way too easy to give a few little boosts to some parts in isolation and suddenly find yourself with an overcooked, bright or harsh sounding mix which will also eat away at your precious headroom. Far better to begin your mixdown by making cuts, cleaning up and decluttering.
For example, you might want to make your bassline really cut through the mix. Instead of just using the EQ to add extra bass, it would make more sense to check other parts in the track and experiment with making EQ cuts at low and lower-mid frequencies to declutter the sonic space in which the bass is sitting. The trick is to work out what are the essential/fundamental parts of the sonic spectrum that the bassline ‘lives in’ – what frequency makes it sing – and then to check the other individual non-bass parts of your mix and see if you can cut some or all of this particular frequency area away from them without affecting them adversely.
Finding the ‘Sweet Spot’
To do this, you need to find the ‘sweet spot’ – the point in the frequency spectrum where the ‘heart’ of a sound is, the part which gives it its own personal character. The standard method is to solo the part, in this example, we’re talking about a bassline, and use a Parametric EQ with a narrow bandwidth (or ‘Q’) setting and turn the boost right up. Then sweep the EQ all the way along the frequency spectrum and back again, until you find the part that you like and that contains the main character, the ‘sweet spot’, or the essence of that particular sound. Depending on our audio material, we might find that a boost at 100Hz gives our bassline some really nice fatness. So we then take the parametric EQ off the bass and listen to the other parts in the mix to see if any of them contain extraneous low-end information, particularly around 100Hz that you can cut without affecting their overall sound in the mix.
Instruments like pads and drones, and percussion, like toms, can contain lots of bass information that you can remove without it affecting the sound and impact of these parts in the mix. This then clears out a nice big space for your bassline to sit in. But even sounds that you perceive as being in the top frequencies (such as tambourines and shakers ) will likely have extra un-needed bass information too.
Once you’ve done this process, you may find that you don’t even need to ‘boost’ the bass at all. However, if you still feel you want more from your bassline, you can start to boost instead of cut. A boost at the sweet spot might work well. You might also find that a little boost in the lower mid area, perhaps between 800Hz and 2kHz might bring out some of the other harmonics in the bassline and give it a little punch and clarity. As we mentioned in part one, using overdrive or saturation is a fantastic way to add harmonics, helping the bass to be ‘heard’ on smaller playback systems (phones, laptops, computer speakers) as well as felt.
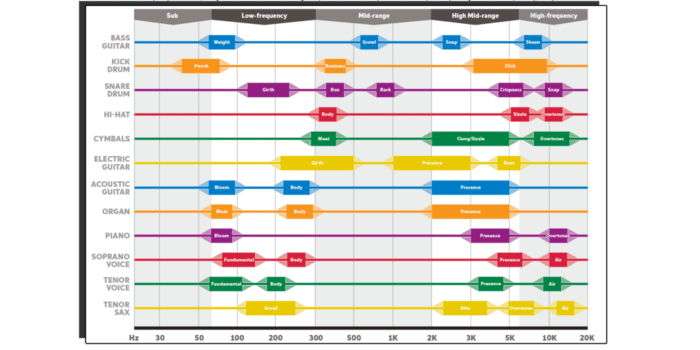
Knowing the ranges that instruments and voices occupy in the frequency spectrum is essential, and which frequencies you choose to boost or cut will be at least partly down to personal taste and of course, every track is different. Whether you boost or cut will be down to the particular sounds that you’re working with, and if these are samples whether they’ve had any prior processing, what source they were sampled from, and so on. So whilst there are no hard and fast rules, as the excellent chart above from Sweetwater shows there are some boost/cut points that tend to produce pleasing results.
- 50Hz – Increase to add fullness to the lowest instruments or sounds in your mix like kick drums and basslines. Decrease in reduce ‘boominess’ in your basslines or kicks
- 100Hz – Increase to add more ‘punch’ or ‘hardness’ to bass sounds. Reduce to increase clarity.
- 200Hz – Increase to add fullness to snares, guitars, mid-range synths etc., reduce to decrease ‘muddiness’ in vocals or other mid-range sounds.
- 400Hz – A boost at 400Hz might add clarity to basslines, particularly at low volumes. A cut can reduce ‘boxiness’ of low-end sounds.
- 800Hz – Again, a boost around 800Hz can increase the clarity and punch of bass sounds.
So that’s our introduction to using EQ on your bass sounds to deal with certain problems. In summary, we would always recommend that you try to fix any issue at the source first – choosing the right sounds can save you hours of frustration and work, and when you do use EQ, always try cutting some frequencies to deal with a problem before you boost.