
Working with samples brings its own particular challenges. In this 2-part, beginners-guide article, we’re going to look at some of the bass-related problems that can arise when using samples in your productions, and how to fix them. Read Part 2 here.
The bass is one of the defining features of any dance track. The low end of the frequency spectrum is where the majority of the energy is going to be coming from when your track gets played on a club sound system, and how well it translates can make or break the reaction to the tune – so getting it right is essential. Whether you’re using analogue synths, VST’s or samples in your work, regardless of the source you’ll need to pay close attention to the bass.
How Low Can You Go?
One of the great things about sampling is the instant mangling that you can do – just a couple of tweaks on a pitch shifter and a big dollop of reverb and you can turn a syrupy soul vocal into the dark satanic ghost of Barry White. Extreme pitch effects on vocals, making them either high-pitched ‘chipmunks’ or spooky rumbling monsters have been used for years in dance music, and to great effect – but any samples that have been substantially pitched down can be tricky for the home producer to handle. Perfect human hearing generally only goes down to 20Hz and your home monitors – unless you have a subwoofer – are probably only going to respond down to about 50Hz. A club sound system, however, will respond to bass frequencies lower than the range of human hearing.
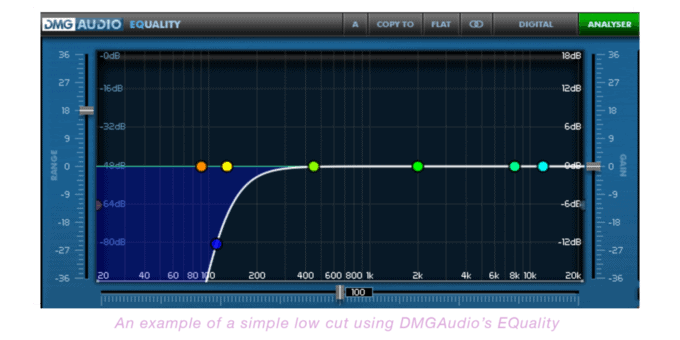
If it isn’t a bassline or a kick drum, then applying a high pass filter is a wise move – a simple roll off of everything between (approx.) 80-120Hz might be effective as there are often unintended low-end frequencies hanging out in other elements of your track too. Our advice is to go as high as you can without noticeably impacting the sound. Whenever you’re making adjustments to EQ or levels, it’s how things sound in the context of the entire track that’s important, not how they sound in isolation. A part that you’ve filtered the low end out of may sound a little thin and weedy on its own but fit just right within the context of the overall mix. You’ll also want to make sure that the kick and bass are in mono since having them in stereo can cause all sorts of phase issues and pretty much all club systems are in mono too. You can check this using various free imaging plugins and/or a mid/side processor.
If you’re having problems getting your kick and bassline to work together, consider making a cut on the kick drum, starting around 25hz and gradually increasing it. Unless you’re making very tough techno, you actually need much less of the kick than you think. You can also experiment with notching out frequencies around the 80/100hz mark which can help to tame some of the thud and thump. For example, In modern drum and bass, there’s a fetish for tightly controlled, punchy (but not heavy) kick drums. This allows so much more room for the bass to come through and provide the weight. As a second option, it’s often really useful to work on the rest of the parts first. Placing an EQ on all of the channels in your DAW and rolling off unwanted low-frequencies with a high pass filter on every channel except the kick and the bass is a good habit to get into, ensuring that there is nothing at all in the mix to interfere with the low end.
The Single Most Important Tool
When it comes to getting that low end right in your mixes, experience and your ears are the best tools and it’s worth taking the time to ‘train’ your ears, by listening to your own productions and comparing them to those of your favourite producers. How do the kick and bass interact? What’s the balance between them? Which of the 2 can you ‘feel’more? Do they happen together or does the bass play off the kick? This can really shed light on the relative levels of the different parts in a track, and help you to understand the balance and energy that’s needed – something that new producers often struggle with.
One the best pieces of advice that you’ll hear again and again throughout your production career is to check your mixes in as many places as you can: on small computer speakers, studio monitors, headphones, the cheap mp3 player in the kitchen and of course the classic ‘car test’. All of these locations will give you different feedback on how effective your low end is, not to mention the rest of your mix. If you get it sounding good in all those places, there’s a good chance it will translate well anywhere. The big test, of course, is a club system, so if you can, try and find someone who’ll let you road-test your stuff on a big rig; you may be amazed at how different it sounds to how it sounded in your studio.

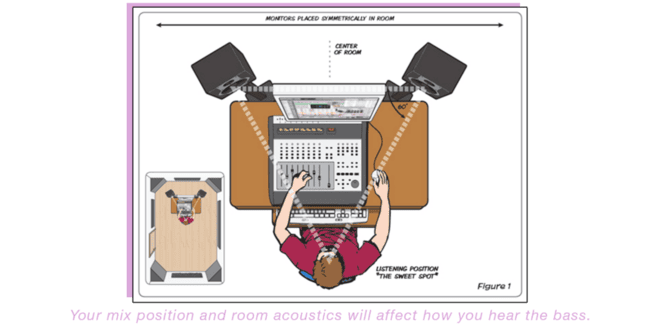
What Does Your Room Sound Like?
Stepping away from the screen for a moment, room acoustics are essential to decision-making within the production process and to accurate bass mixing too. Whilst you may not be able to professionally acoustically treat your room at home, you can at least always ensure that you and your monitors are all sitting at the corners of an equilateral triangle, which will assist substantially with hearing the ‘true’ sound coming out of the monitors. Soft furnishing and wall hangings can help dampen unhelpful sound reflections too, but it’s learning how your room actually behaves that is the most crucial thing here. If you have a good idea of how the shape and nature of your room affects what your music sounds like, then this will be a huge help when producing and making critical decisions. Again, this information is learned by listening and comparing in other environments, and then going back and adjusting your mix accordingly.
Another low-end issue that can affect samples is this: you scour your Dad’s old records and finally find a cool snippet of audio – it’s got drums, it’s got bass but most importantly it’s got a superb groove. So far, we’re winning. So you sample it, chop it, edit it and loop it and it’s sounding great – until you compare it to a contemporary song when you realise that older tracks often lack the power and impact of modern recordings: they simply don’t have the huge, precision-engineered low end that we’re used to, and so it sounds thin in comparison. You can encounter a similar issue if you pitch a sample up: you start to lose bass information and it starts to sound thin and weak. In this situation, before you start reaching for the bass EQ, you could try a couple of other things:
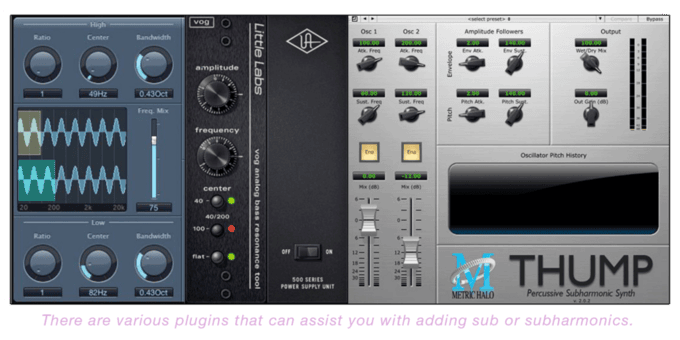
If it’s a bassline or full track groove that you’ve sampled, you could try playing a sub-bass underneath it – this will increase the low-end impact without affecting the character of the sample – although you’ll need to play it very tightly to make it work. The second, and easier option might be to try using a bass-enhancer plugin – most DAWs come with bass enhancers and of course, there are plenty of external plugins available that will do the same job of generating lower end harmonics to beef up your bass.
There’s More To Bass Than Meets The Ear
Another thing that is useful to remember is that bass and kick drum samples don’t just contain bass frequencies, they are often rich in harmonics and aside from their fundamental frequency will often have lots of other sonic information present as well, including plenty of mid-range and sometimes even some top end too. Experiment with gentle, narrow mid-range EQ boosts to see if that gives your bass sound that extra impact you’re looking for. Alternatively, you could apply some distortion, overdrive or saturation which can introduce some higher frequency content to help the sound cut through the mix. Logic’s stock overdrive is great for this, and generally speaking, tape emulation plugins such as U-he Satin, or UA’s Studer A800 do an excellent job at adding some harmonics.
Getting the low end right is essential if you want to make tunes that seriously bang in the club. There’s no one easy trick, it’s a combination of a number of small techniques that add up to great sounding bass. We have only briefly touched on EQ which we’ll delve deeper into in part 2. Meanwhile, if you’re just starting out in your production career, we recommend that you: start to train your ears, listen to your work on lots of different speakers, and compare your tracks to those by your favourite producers. Do these three things and you’ll definitely be on the right track.