
1. Start With The Most Important Elements
Decide what the most important elements of your track should be, and begin with those. This way you can start to build a hierarchy that will help you make decisions about what should have prominence – and how much of the ‘landscape’ it should take up. This might sound obvious, but it’s amazing how much we’re generally drawn to the drums as an automatic starting point. Whilst this works for drum & bass and most house or techno, drums are clearly not the focal point in pop, jazz or ambient records and so it really makes no sense to start your mixing process with those. If your song is a pop song, then almost all of the time the vocal will need to be the most prominent element of the mix – if it’s a jazz record, then it’s likely you’ll want to hear the keyboard or the piano as the most dominant instrument. Decide, and then mix accordingly, bringing in each element in order of importance.
2. Write Drunk, Mix Sober
We’ve all been there – you’re feeling inspired during a late one in the studio, perhaps after a great gig or life-changing night out, but I’d strongly caution against making critical mixing decisions during these sessions. As the old literary saying goes, “write drunk, edit sober”, and I think it’s sound advice for a few reasons:
Many drugs, especially alcohol, create a false sense of confidence in us, and this extends to our decision making. It’s also been found that (time for the science), alcohol actually changes our hearing response and the linked study notes that “that alcohol impairs the processing of tones, frequency change and novel sounds at different phases of auditory processing similarly in both hemispheres”. Beginning the writing process with the help of intoxicants can be beneficial as we tend to be less inhibited, more in the ‘flow’ state and initially this can help us to be more inventive, more child-like and creative, reducing the insecurity that often plagues us once we start to over-analyse what we’re doing.
So mixing when intoxicated might be fun, but in my experience, from a critical and technical perspective, it rarely yields good results. Everybody is different, of course, and people react to intoxicants in different ways. You genuinely might do your best work under these conditions and I find it to be true that the more experienced you are, the better you’ll be whatever the conditions. Most of the great music of the ’60s and ’70s (and many other times) was recorded and/or mixed by musicians and engineers high on all sorts of substances. Music and drug culture are inextricably linked and there’s no getting away from that – so if you choose to indulge, please do it in a safe way that minimises the harm to yourself and others. That being said, my advice is always to do final mixes after a good night’s sleep, with fresh ears and a clear head, especially if it’s an area you’re still trying to master and understand.
3. Less Is More – Refine Your Arrangement.
The mixdown process is also a great opportunity to refine your arrangement. My first bit of advice here would be to try and avoid being strictly wedded to a certain arrangement if it hinders your ability to mix the record well. For instance, If you’re having trouble getting a fairly harsh-sounding synth solo to sit with a lead vocal part, whilst you could try eq’ing some of the harshness or lowering the volume of one of the tracks, it might be a better solution to consider moving the synth solo so that it comes in once the lead vocal stops and leaves a more natural space for it. Making these types of creative decisions can save you hours of frustration trying to get 2 parts to play together in a cohesive way. In addition, Once you start to add processing to channels or groups, you may notice that certain parts of the mix now have more energy or an emphasised tonality and should take on a more (or less!) significant role in the overall musical idea. Very often I find that elements that I was set on at the start of the creation process and that I felt would be crucial and basically indispensable to the record can now be removed completely without negatively affecting the overall feel, energy and vibe of the track. If you’re making club-focused music, this is especially important since the more elements you have, the more information has to be translated (and is likely to get lost) over a loud club system. You’re far better off having the minimum number of excellently produced and mixed elements as you can get by with.
4. Take Breaks, And Rest Your Ears Often.
Taking regular breaks is important, especially when mixing. Not only does it prevent ear fatigue and reduce potential longer-term ear damage when listening at high volumes for long periods, but it acts as a kind of ‘ear reset’ so that once you go back to the mix, you should be able to hear different elements pop out at you. I’d recommend something like a 5 or 10-minute break after each hour of mixing. Keeping the volume at a reasonable level will assist you too. If your mix doesn’t sound right at a low volume, turning it up won’t help you. You might think it sounds better, but that’s a flaw in the way our brains process audio. I cannot stress the importance of keeping the volume at a comfortable level. It’s fine to kick it up at certain points to check for energy, or impact or clarity, but do this sparingly. Your ears, and neighbours, will thank you.
5. Reach For The Reference Tracks.
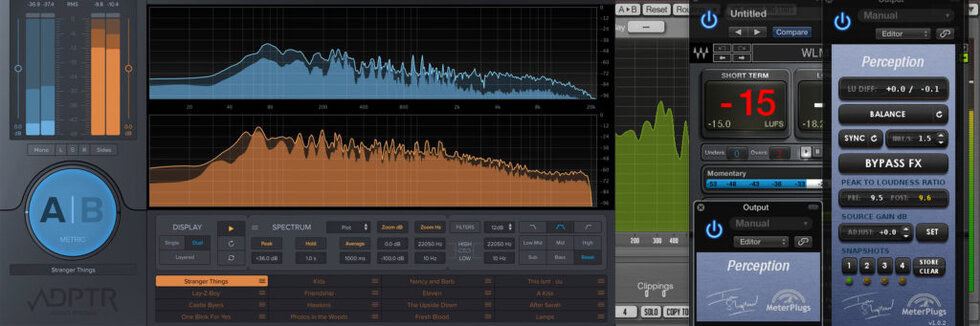
Reference tracks have become an integral part of my mixing process. I personally buy all my music as AIFF files so that these same tracks can double as high-quality reference tracks, as well as being used in my DJ sets. Sometimes I’ll feel great when I’m A/B’ing a reference master that I really like, and I can hear that my track sounds pretty close to it, and sometimes it has the total opposite effect if I can hear that my mix isn’t sounding anything like it. It’s important to volume balance because of course, a mastered track is always going to be louder than the one you’re currently working on (unless you’ve got lots of processing on your master output). Sometimes I’ll use a compressor and a limiter to achieve a somewhat comparable volume while I’m mixing but for the most part I prefer to mix without these. 2 plugins I would recommend here are ADAPTR Metric AB and Perception, and although both are perhaps aimed more at the mastering stage than the mixing stage, they’re really useful pieces of software that I utilise – both are easy to set up and both have the benefit of level matching your audio first so that you can hear if you’re actually improving your track, rather than just making it louder.
6. Get To Know Your Room.
If you haven’t already realised, your mixing environment will lie to you. Unless you’re fortunate enough to be working in a purpose-built, perfectly treated and acoustically tuned space then your room will be interacting with and affecting the sound once it leaves the speakers. Simply put, sound waves travel from your monitors through the room, and then behave in a particular way depending on which surfaces they hit. Without getting deep into acoustics (a subject which is way beyond the scope of this article), this is something that you need to be aware of because the decisions you make when mixing will be based on the (most likely skewed) frequency response and behaviour of your mixing environment. This can lead to all sorts of issues in relation to bass levels, stereo width, comb filtering and so on.
There are several ways that you can try to reduce the negative effects of the space you’re working in, and I’d recommend spending a little bit of time on this, especially as many people now are using spare bedrooms and basements, etc as project/home studios. If you’re starting out making music it’s highly unlikely that you’ll have given anywhere near as much thought to your mixing environment as you have to what monitors or interface you’d like to buy. You can ‘get away’ with not having a perfect room as long as you understand what’s going on with your room. So here’s my advice:
- Reference tracks – whilst sitting in your mix position, listen to lots of music, preferably in WAV or AIFF format from the same or similar genres and start to get a feel for how they sound in your room.
-
- Consider purchasing a cheap measurement mic and running some sweeps using Fuzzmeasure or Sonarworks. The software is fairly pricey, but for both of these applications, there’s a free trial that you can use to give you an idea of the issues your room might be hiding. Even if you choose not to purchase, the measurements you get can still be helpful in knowing exactly where you stand in terms of frequency response. Sonarworks also do headphone calibration as well, which enables you to work on headphones much more confidently and achieve a result that’s much closer to what it would be if you were working on monitors.

- A Subpac is a great solution for judging the low-end of your track. Whilst they’re not perfect (you’ll need to get the volume right by using reference tracks) and can be a little rattly when pushed too hard, they are useful for honing in on how your kick and bass are interacting and for giving you an idea of just how much low-end is below the frequency range that your monitors can pick up. ‘Feeling’ the music more closely to how you’d experience it in a club can also help you in getting a vibe from what you’re working on.
-
- Lastly, having a great working relationship with a mastering engineer that you trust and can talk to openly about any mistakes you might be making or any improvements you can make, can be very helpful. I use Tank Edwards at Warm Audio Mastering who I speak to on a regular basis and who’s honest enough to tell me when there’s something I can fix in the mix to enable him to deliver a better master. In addition, he’s been to my studio so he has an understanding of my mixing environment and why I’m making the choices I am during mix sessions.
7. Observe The landscape.
‘Landscape’ is a term which I love to use as an analogy to mixing audio, because in the same way that you view a photo or painting when you listen to a sound recording you are hearing an audio landscape. Some parts of the recording might be close and upfront, and draw your focus (like vocals, or lead guitars), some may be panned left or right in the stereo field, and some may be way back in the distance (such as washed-out vocals, or subtle sound fx), and many of the sounds you hear will likely have been processed with the specific intention of making them ‘sit’ in a particular space in that picture. When we talk about ‘presence’ or ‘clarity’ or ‘stereo field’ what we really mean is ‘the space this element should occupy in relation to other elements’. Not every element of our mix can be upfront and draw our focus. Not every instrument in our mix can occupy the same space, sonically. Creating a sense of space and depth can be achieved by thinking of your audio in this way and I personally find that it actually makes things easier when you accept that not everything can be the focus, and doesn’t need to occupy a dominant space in your mix.
8. Find The Sweet Spot.
I believe that every instrument/channel in your mix has a ‘sweet spot’. A sweet spot from a mixing perspective is defined as being neither too loud nor too quiet – in other words, the optimal volume as it relates to its place in your audio landscape. A good way to find this sweet spot is to come up with a range for each track in your mix. You can do this slowly turning the channel down in volume until it feels too quiet, and you’re struggling to hear it. Make a note of that volume, because you know it’s not going to be any lower than that. Then, reset the channel back to where you initially had it, and turn it up, 1db at a time. Pretty quickly you’ll reach a point where it’s very obviously too loud. Make a note of this volume, because you know it won’t be any higher than that. Your ‘sweet spot’ for each channel or instrument is somewhere between these 2 points. You may also benefit from some subtractive eq when trying to get 2 parts to work together.
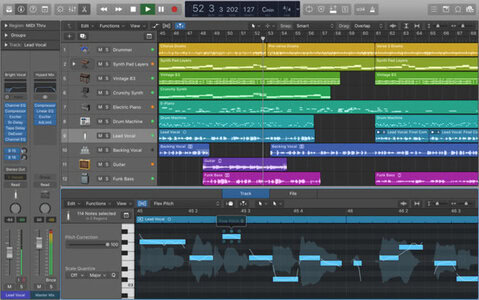
9. Create A Separate ‘Mixdown’ Project File.
![]()
![]()
When starting the mixing process, I’d recommend creating a ‘Mixdown’ version of your project file as an alternative so that if you wish to go back to the original and start over, then you have that option. I have been guilty of the overzealous processing of channels more times than I’d like to admit, and this has led to the track sounding unnatural, lifeless and too far away from the original feel and sound that I intended for the record. Having the original version and being able to ‘go back to the drawing board’ as it were, has been a lifesaver on many occasions.
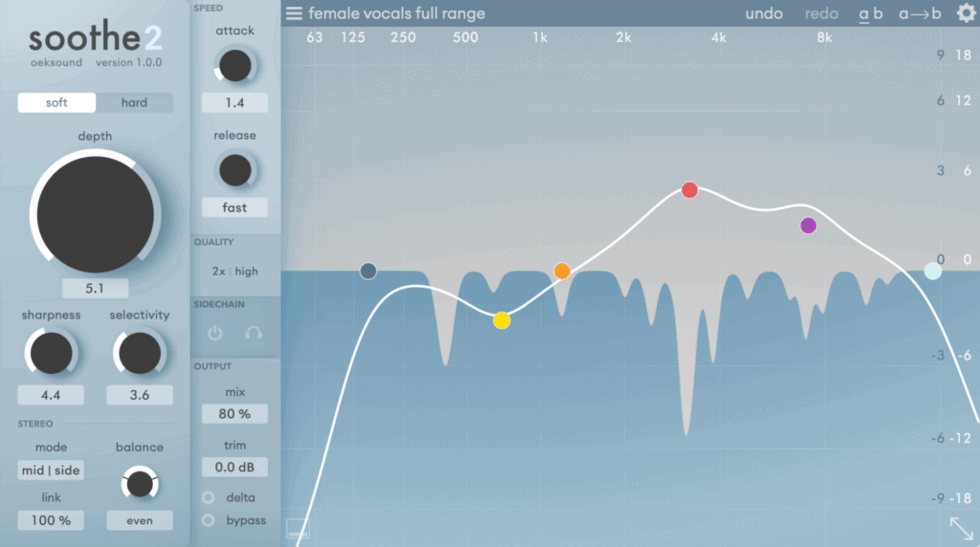
10. Soothe Your (Resonant) Troubles Away.
Soothe 2 by Oeksound has been an absolute gamechanger for me. I cannot recommend this plugin highly enough. It’s one of those plugins, much like a couple I have from DMGAudio, that just make you go “Wow. How did I ever get by without this?” Oeksound describe it as a ‘dynamic resonance suppressor, which identifies problematic resonances on the fly and applies matching reduction automatically.’ In simple terms, it reduces harshness and sibilance, especially on hi-hats and vocals, and it does it in a way that’s constantly adjusting to the incoming audio (dynamic). It tames pianos and plucky instruments and can be used even as a creative sound design tool if pushed to its limits. Tip 10 is dedicated just to this plugin, it’s that good.
And Finally: Perfect Doesn’t Exist, So Stop Chasing It.
Mixing, in it’s most simplistic form, is about actively listening to the audio coming from the speakers and then making decisions based on what you’re hearing. It’s about balancing the individual elements in a way that maximises the potential and emotion that you (or the producer of the record) intended. Like anything else, the more of this you do, the better at it you’ll become. It’s very easy to get lured in by the belief that spending more time on something will make it better, and very often this isn’t the case. There’s a famous story that Bruce Swedien tells about mixing Michael Jackson’s Billie Jean 91 times, before eventually going back to mix 2, which was the version released on the ‘Thriller’ album and is the one that we all know and love.
My point here is that even a record which we think of as perfect, probably isn’t to the people that made it, and they likely went through the same process of self-doubt that you are. The longer you spend on something, and the more you tweak it, the more you run the risk of losing perspective (and your sanity). For every record I’ve ever made, I could pick out 2 or 3 things which stick out to me as being ‘wrong’, or that I would have done differently, or that I feel could be improved. At some point, we have to commit to a mix being finished and let go of the fear of judgment that might come when we say “this is done. It’s finished.”