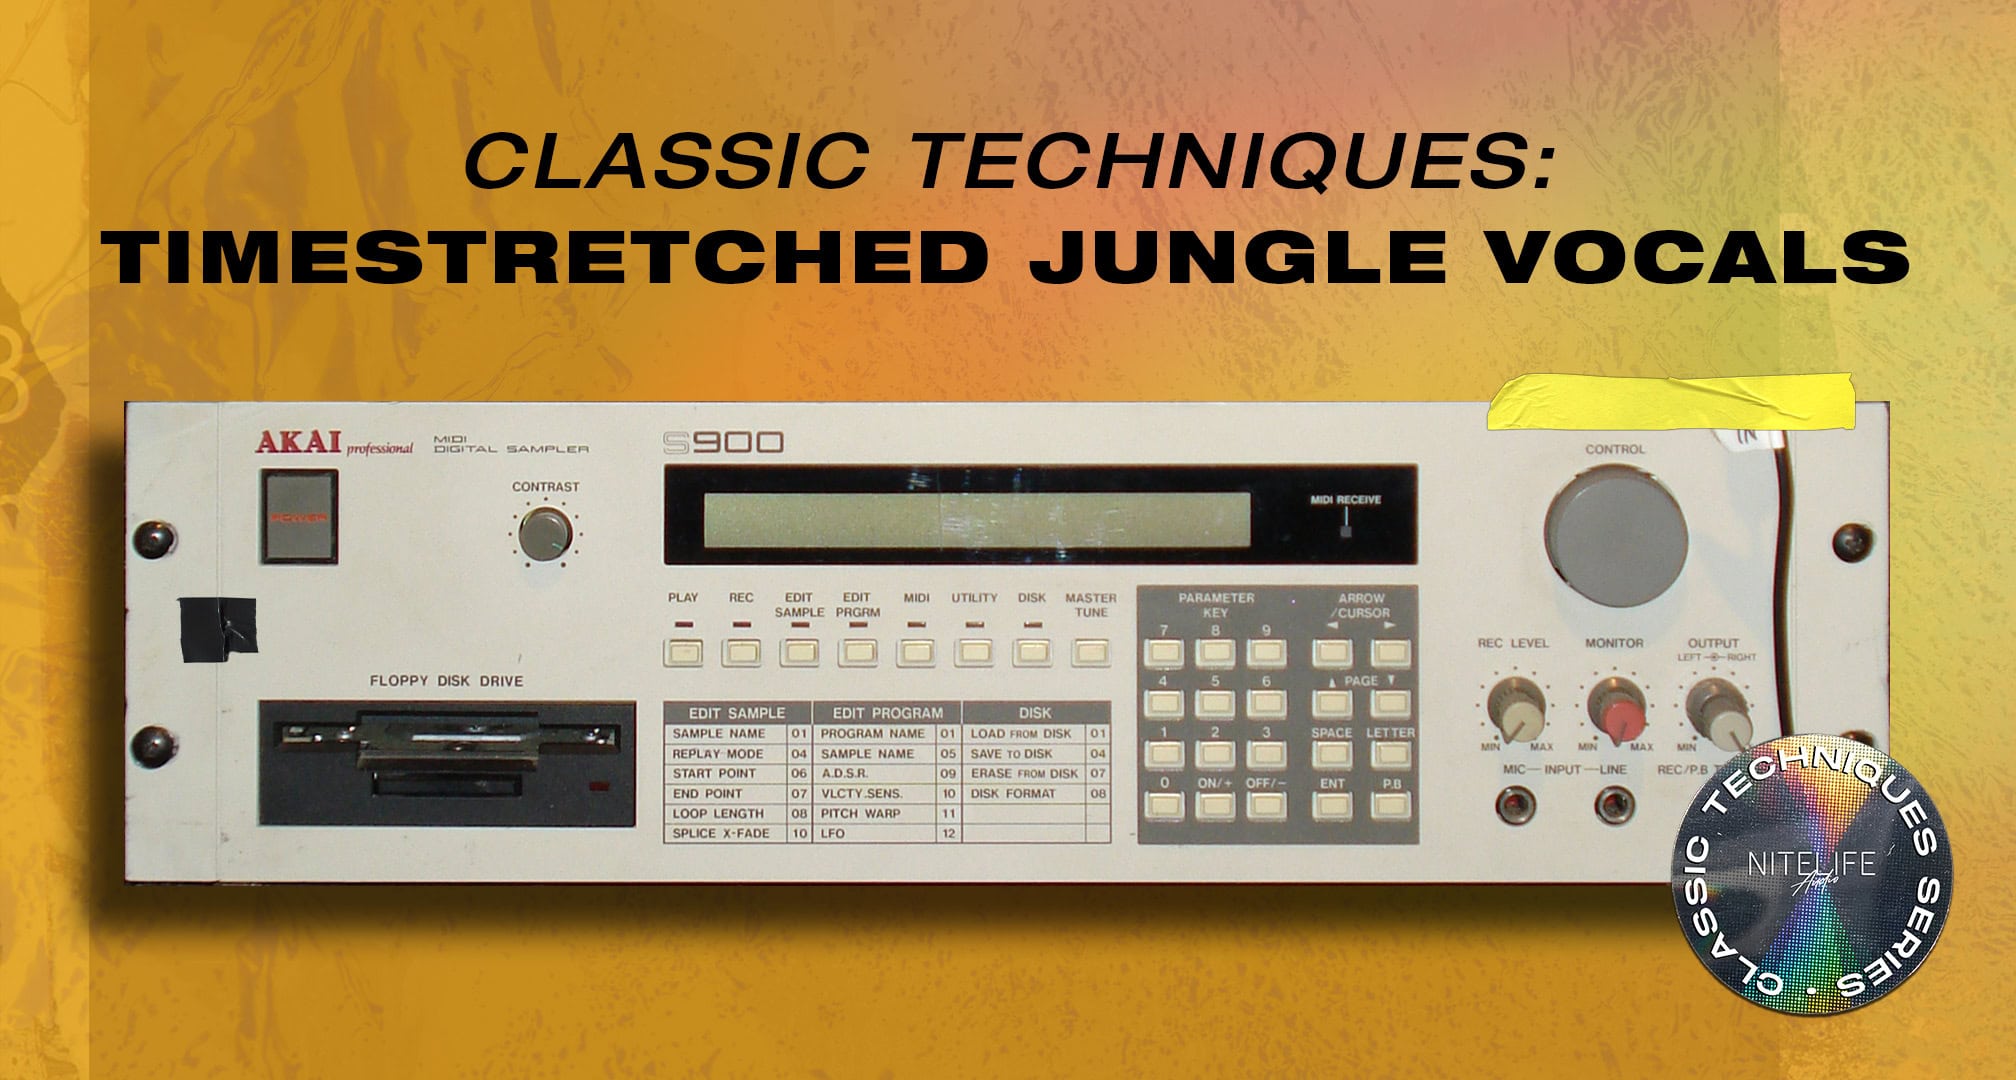
In this article from our ‘Classic Techniques’ series, we’re examining one of the most distinctive sample techniques to emerge in the 1990s – the timestretched jungle vocal.
The frenetic beats and earth-quaking sub-bass of drum and bass have become a global-dominating sound and the genre continues to develop in new and interesting ways. Drum and bass was born from Jungle, which first developed out of hardcore breakbeat rave music in the early to mid-90s. It was a hugely fertile and productive time for dance music, as the price of decent home equipment dropped and producers delved deep into the submenus of their kit to shape their sounds to their precise desires. This was particularly noticeable in the Jungle genre, as junglist producers embraced the idea of the studio as a lab and their role as that of sonic scientist, and it seemed that each new release raised the bar with the cut-up and fractured breaks manipulated to new levels of poly-rhythmic intensity.
One of the many studio innovations that Jungle bought was the introduction of a brand new sonic texture to the producer’s toolbox, that of the time-stretched vocal. It’s a very distinctive sound and instantly recognisable, where a vocal sample is stretched out and in the process gains a stuttering, metallic sheen which sounds futuristic and robotic.
Hardcore Junglism!
Dead Dred’s ‘Dred Bass’ on Suburban Bass is usually acknowledged as the first Jungle record to feature the time-stretched vocal effect, and you can hear it in countless other Jungle tunes from the likes of Shy Fx, Origin Unknown, DJ Hype, Remarc and so on. It also became popular in house music and featured in many records, including Josh Wink’s acid banger ‘Higher State of Consciousness’. UK Garage was also happy to adopt it, notably on Armand Van Helden’s Remix of ‘Spin Spin Sugar’ and Double 99’s massive ‘RIP Groove’ from 2001.
Just like many other audio innovations in dance music, the Jungle time-stretch vocal was the result of a piece of studio equipment being stretched beyond its own capabilities. The technique was actually the sound of the time-stretch algorithm from the Akai S series samplers, being pushed way beyond its normal limits and producing audible ‘artefacts’. As the BPMs and complexity in Jungle steadily rose, so did the demands on the Akai’s time-stretching functions, and that distinctive robotic, shimmering sound was the lucky result.
Warp Factor 9
Audio technology has of course vastly improved since the birth of Jungle and all DAWs now come with time-stretching and warping abilities that allow users to change the pitch and tempo over a vast range, with little if any noticeable degradation to the original sound. Audio warping and time-stretching software now aims to eliminate any audible artefacts to maintain sonic integrity and the original characteristics of the sound, particularly for vocals. But for us to get anything approaching this Jungle time stretch effect, we’re going to have to deliberately circumvent the innovations of the last 20 years, and try to achieve an un-natural vocal sound.
As with many sampling techniques, there are often several methods of achieving the same end, and it’s the same with this; so we’re going to supply some of the most straightforward methods to get results quickly.
In Ableton Live, if you were going to warp a vocal sample, you would usually reach straight for the ‘Pro-Complex’ setting to ensure that it sounds as natural and unprocessed as possible. However for this technique, we’re not looking for pristine vocal processing that you don’t notice, we want to achieve the opposite, we want this to be all about the sound of the processing itself and not the sound of the vocal. To achieve this you will need to select the ‘Tones’ warp mode. Then you can simply change the length of the loop and click on a marker on the sample to stretch it out as long as you like. You’ll quickly hear all the aliasing and achieve the stuttering, metallic sound we’re talking about. Ableton allows you to alter the ‘grain size’ – you can think of grains as tiny snippets of audio used to create a larger waveform. Experimenting with the grain size will get you the effect you’re looking for here, generally, a higher grain size will create that particular stutter effect we’re looking for. Adjusting the grain size also contains the potential for all sorts of far-out vocal processing too.
In Cubase, you right click your sample, click process to enter the time-stretch menu and select the ‘Standard’ algorithm. Aside from the grain size, Cubase also allows you to adjust the ‘overlap’ and ‘variance’ which are controls to help the results to sound as natural as possible: in this case, low values of each will be appropriate. Again, try experimenting with high grain sizes to get the Jungle time-stretch effect.
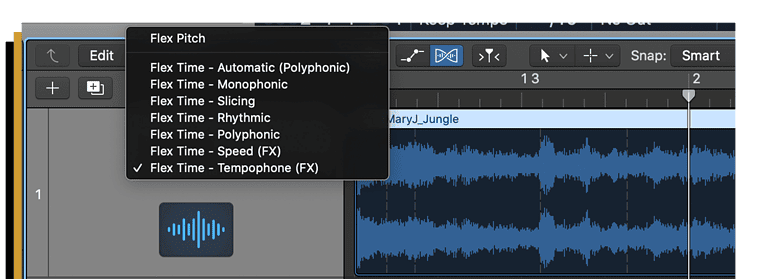
Logic Pro’s Flex allows easy stretching and warping of vocals and again, here it’s about reducing the software’s ability to do the job seamlessly. So select ‘Tempophone’ mode and just by selecting and stretching an area you can easily get a sound that approaches the 90s Jungle feel. The default grain size of 45 ms is perfect for this but Logic also gives you control over the size, so again, you can experiment with this setting for more extreme vocal effects.
Reason’s slice markers allow for all sorts of stretching and warping, although abusing the software to affect the sound in this way is slightly more involved, as Reason’s automatic warping doesn’t seem to allow you to degrade it in the way you can in Logic or Ableton. Luckily there’s another neat trick you can do instead to approximate the Jungle time stretch effect – and this trick will work in any DAW you like: First, you load your sample up, then in your sequencer draw a long line of 32nd notes next to each other, each with zero attack and release. If you then press play on the sequencer and automate the sample start point, it will produce a fair approximation of the Jungle time-stretch sound as the sample continually re-starts from a slightly different point. Adding a little delay and reverb will help mesh the sound together. You may also find that a hint of flanger can also add an authentic metallic sheen to your sound.
As an additional option, there’s also a very good freeware plugin called Akaizer that’s available for all platforms (Windows, Linux and OS X) which can time stretch (and/or pitch shift) any WAVE or AIFF sound file in the style of the ‘cyclic’ time stretch which featured on old Akai sound samplers, like the S950 / S1000 / S2000 / S3000 series. It’s definitely worth checking out and in our tests yielded some pretty authentic sounding results. However, please be aware that as Akaizer is freeware, it’s not supported by 64bit systems and may not work with your current OS.
The Jungle time-stretched vocal is a hugely evocative sound that can instantly transport you back to the mid to late-90s club scene. However, it is also a technique that still sounds unarguably futuristic and your DAW will allow you enough control over the various parameters to take this technique and develop it way further if you wish. Alternatively, you can easily achieve that classic sound and give your tunes that 90’s Jungle flavour with ease. Get up and get stretching!
We take a closer look at one of the simplest yet most effective sampling techniques to have emerged from dance music: the filtered disco loop.
Filters have long been revered by electronic music producers. Although they were originally designed as tone controls to address particular sonic problems, dance music producers came along and misused filters in ways that took them far from their intended purpose. It was Chicago producer DJ Pierre who first bought the squelchy delights of a decent filter to the attention of other beatmakers. His tweaking of the filter cut off and resonance controls on his Roland 303 on 1987’s ‘Acid Trax’ by Phuture created the new genre of acid house and filters have been used extensively in dance music ever since. Although the very first samplers had no synthesis functions at all, it didn’t take long for manufacturers to begin making samplers with filters, envelopes and LFOs, bringing a whole new suite of sonic possibilities to working with samples.
Music Sounds Better With Filters
The filtered disco loop is a technique that has been used countless times in dance music and which never fails to work on a packed dance floor. You can hear it used in Pete Heller’s ‘Big Love’, Stardust’s ‘Music Sounds Better With You’ or Pepe Braddock’s sublime ‘Deep Burnt’. Essentially, this technique takes a sample loop and then puts it through a low pass filter. The audio then sounds muffled, with no top and very little mid-range, as though you’re listening to it through a wall while it’s being played at a house party next door. Then slowly the filter opens up to gradually reveal the rest of the frequencies. Careful manipulation of the filter on a track can tease and tantalise a crowd before delivering a knock-out blow. It’s a simple but brilliant technique that has destroyed dance floors for years, largely because it is a hugely effective way of building and then releasing tension in a song. The use of the filter to tease an audience with a disco loop was so popular, it became the basis of an entire genre, in the shape of French house.
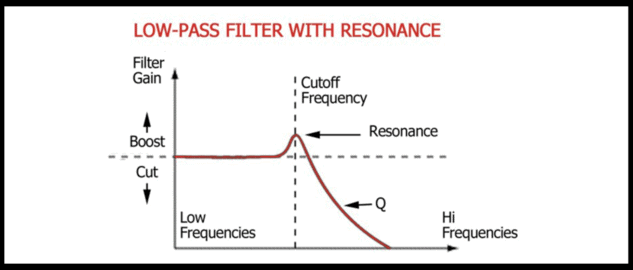
To get this technique working in your tracks, you’ll need to understand what filters do. Although they perform a similar role to EQ in that both adjust the tone, filters work in a different way. EQ boosts or reduces a range of frequencies, filters let audio above a certain frequency pass whilst attenuating anything outside those limits. So a filter doesn’t just either boost or cut a particular frequency like an EQ, it entirely removes all the frequencies below or above a certain limit. It’s the changing of this limit – the moving of the cutoff frequency by the producer during a filter sweep – that provide the characteristic sound of this technique. There are a few different types of filters, but here we’re going to be looking at the low pass filter, which, as it name suggests, lets the low frequencies pass whilst attenuating the rest of the frequency spectrum.
“None Shall Pass!”
One of the key things to consider when using filters in your productions is the slope of the filter. The slope refers to how – either gently or sharply – the filter cuts off the frequencies and is measured in decibels per octave (‘dB octave’). The filter slope determines the reduction of signals outside the ‘pass’ frequency and gives a filter its particular sonic character. Generally, this slope will range from 12dB to 24dB per octave. If a 12dB filter is set to 100Hz, then any audio an octave below that at 50Hz will be reduced by 12dB, and any audio an octave below that at 25Hz would be reduced by 24dB and so on.
For the purposes of making a looped disco sample into a fat pumping dancefloor destroyer, all we really need to know is that the steeper the slope, the more pronounced the effect of the filter and, when used in tandem with higher resonance settings, the more intense the ‘squelch’ effect of the filter. Essentially you would use a lower slope for gentle tonal shaping, and a higher slope for performing an ‘in your face’ filter sweep.
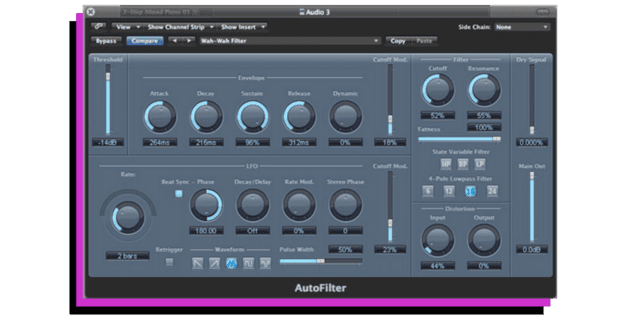
Your DAW will have a number of filter types available and there are plenty of decent filter plug-ins on the market, but in Logic and Ableton the auto filter defaults to a 24db low pass and in Reason, the ECF-24 standard filter is a 12db low pass. In Ableton Live you can drag an Auto Filter from the effects onto the sample you want to filter. In Logic, you can select the track you want to filter, re-route the audio to an empty bus and add the AutoFilter to the track that Logic will create. In Reason, you can just right click on the instrument you want to filter and add a filter unit from the menu.
If you’re after the true sound of French filtered house, you like the tactile interaction of physically tweaking the controls, and you’re feeling particularly flush with cash (or maybe you just hate money and you want less of it), then you could invest in one of the genuine filter units used by Daft Punk and their peers. Your choices are; The Mutator, made by Mutronics, based on technology originally developed for analogue synthesis in the 60s and which was the go-to stereo analog filter and envelope follower for many of the bands and musicians who shaped the 90s sound.
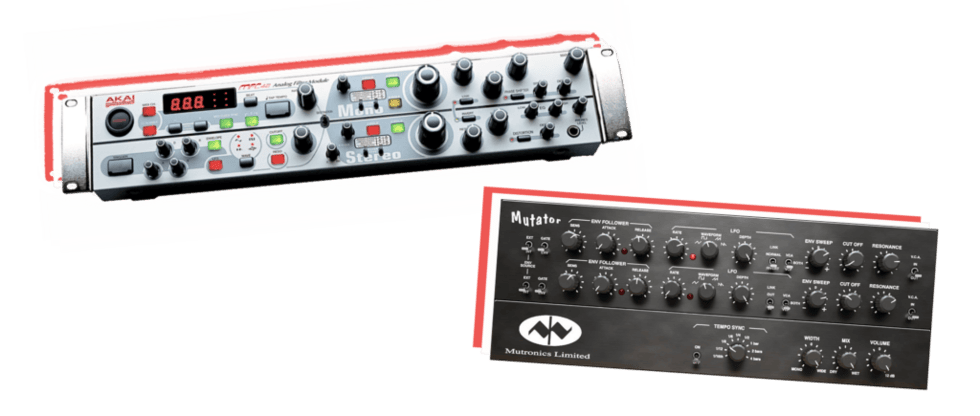
Another option is the MFC42, a true analog filter module designed by Akai for their MPC-series gear. You can use it to process any sound source since it has basic 1/4″ inputs and outputs and MIDI. It has genuine analog filters for that warmer tone with Lowpass, Highpass, Bandpass, and Notch filter types. You can find them on eBay from time to time for a price that isn’t too crazy (around £800) and they really do have a wonderful sound which instantly transports you back to the squelchy funk of the filter-disco-loop era.
Unfortunately, in the case of The Mutator, an important component was discontinued by the manufacturer which effectively killed production. Since then, it’s became very much a collector’s piece, and the only way artists/engineers can get their hands on it is via auctions or eBay. We’ve seen some go for as high as an eye-watering £2800. There is a Softube plug-in version, although as we haven’t tested it we couldn’t definitively say whether it’s an accurate recreation, but Softube overall are an excellent developer so there’s a good chance it’s very close.
In terms of what you’re applying the filter to, you may want to process the entire track, an individual sample, or a group of samples. Some producers leave a hat or a clap unfiltered to hold the rhythm together and some leave the kick outside the filter sweep so that all the low-end energy doesn’t get over-amplified during the sweep. Other tracks feature filter sweeps where every single part is filtered – it’s a creative decision, depending on how you want your tune to sound and what effect you’re aiming for.
If you’re going to filter the entire song rather than just individual samples, in Ableton you can simply drag a filter onto the main outputs, and in Reason you can right-click on the hardware interface unit and drop a filter straight onto it. In Logic, you’d just select all the parts, re-route to an empty bus and add the filter there. Alternatively, you can use Logic’s ‘summing stack’ command. The Autofilter in Logic allows you to adjust the level of dry and wet signal and for this technique, you need to have the signal entirely wet. LIVE and Logic’s auto filters should default to 100% wet, and Reason’s ECF has no dry/wet controls at all.
Cutoff And Resonance: A Deadly Duo
Once you’ve got your filter in place (and you’ve remortgaged your house for the Mutator), you’re ready to get tweaking. Moving the cut off control anti-clockwise will slowly reduce more and more of the top and then middle frequencies until you’re just left with the lows and that characteristic muffled effect. Turn the control completely to the left and the sound will disappear entirely. Now you can start to increase the resonance whilst sweeping and you should start to hear some serious squelching as the filter moves through the frequencies. This is caused by the resonance control adding a little boost to the frequencies just above the cut off point. It might be tempting to simply turn the resonance up high but you have to beware – high levels of resonance can provoke extremely loud volume peaks as you perform your sweep.
This is a genuine health and safety issue if you’re working on headphones, and can also cause you to shred your monitors if you’re not careful, so we would strongly advise caution at this stage. We would also recommend using a compressor to reign in the inevitable peaks, and maybe also try adjusting the resonance up and down manually as you sweep the cut off to maintain a more even volume level. Depending on the audio material and the behaviour of the particular filter you’re using, you may also find that you need to turn the resonance down once the filter is fully open to avoid a drop in volume or an over-sizzled sample. In many cases, it works well to automate the resonance along with the cutoff for maximum character and vibe. It can also help your record to feel a lot more human and ‘Alive.’ That was a Daft Punk reference, in case you missed it.
The trick is to use the filter to give little glimpses of the sample and to hint at its existence to build tension. You can do this with smooth sweeps or experiment with more radical tweaks – experimentation is half the fun. The cutoff and resonance controls are a gateway into hours of filtering and squelching and can be a key part of a live performance too. It’s such an effective technique that entire records have been built around nothing more than a filtered disco loop and a beat. Hell, some artists have built an entire career from a beat and clever filtering of a choice groove. However, while sampling chunks of old disco records might have been the route to filter-house success in the past, major record labels now have entire departments dedicated to tracking down copyright infringements. Luckily, there are now enough high-quality royalty-free sounds on the market for producers to be able to build their own disco-style loops using drum loops and individual instruments. All you need are some keys, a guitar lick, some bass, and perhaps some strings and/or brass which you can ‘mix down’ or bounce in place to create a stereo file. From there you can add some tape saturation, vinyl crackle, and any other lo-fi style processing that your heart desires, in order to get closer to that ripped-from-your-record-collection feel. You can then resample it again, and filter it to your heart’s content. That way, you get to keep all the royalties and publishing when your filter-disco-house track goes global next summer.

Continuing our look at the current boom in external hardware samplers, we review three of the best machines released in recent years that come in around the £500 price point.
Akai MPC Touch
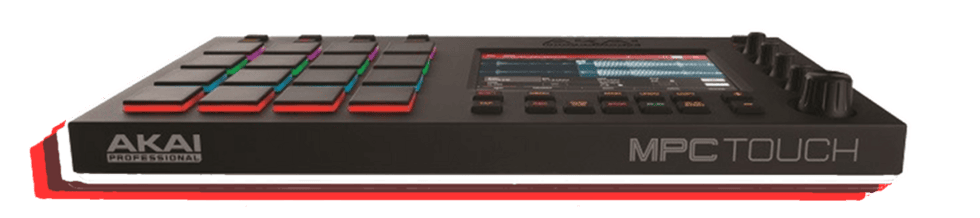
First up we have a great sampling box courtesy of a company with some serious heritage in the world of sampling. Of course, the Touch is not the newest addition to the MPC range but it’s the one released in recent years that fits into the budget remit for this article. and it is a beautiful machine. What set it apart from its competitors upon it’s release was the large (seven inch!) colour display multi-touch screen, which allows tactile iPad-esque editing of samples, and allows the user to draw, edit and work with samples in a visually intuitive way. It’s a very well-spec’d controller rather than a standalone sampler, so you’ll be using it in conjunction with your computer. You should be able to pick one of these up for under £500 and it’s really a wonderful entry into the world of Akai and MPC products if you haven’t yet made that leap. If you’re after a standalone machine, then the Live or soon-to-be-released Live II will fit the bill for you, as will their pricier flagship product, the MPC X.
Akai MPCs were always famed for their workflow and the MPC Touch doesn’t disappoint in this area. Aside from the smart screen, the Touch also comes with 16 full colour (extremely) responsive pads, four small and one large encoder. You also get two sets of back-lit soft buttons, transport controls underneath the screen and bank selection controls above the pads.
The Touch allows sampling directly through the 1/4 inch jack audio inputs or through the USB, and it comes with 1/4 audio outs to allow you to further process your sounds with external gear. You also get MIDI in and out and a headphone socket. It’s slightly larger than the average laptop and there are no battery options with this beast, it will only run on mains through a wall socket.
As you might expect, it ships with 20gb of samples (that’s over 20,000 sounds) and also comes with a decent set of FX, which can also be controlled via the screen through a Korg Kaoss-type ‘XYFX’ mode. Indeed, it is the touch screen which really sets the Touch apart from its rivals at this price point, providing an intuitive and tactile approach to working with sampling – using it in tandem with the machine’s onboard step sequencer can also be an extremely fruitful way of working if you enjoy the particular constraints of step sequencing.
The strengths of the MPC Touch are simple – the workflow is superb and the touch-screen brings an element of intuitiveness that you just don’t get with a standard screen. Equally, there are multiple ways to do the same things, using the screen, the buttons, the encoders etc. It’s also a great looking piece of kit too and comes highly recommended: With all of the new models that Akai have released in the last 2/3 years, picking one of these up now second-hand represents good value for money and is more than capable of providing a creative working environment away from your computer.
Roland SP404A
Roland call their latest incarnation of their SP404 series a ‘Linear Wave Sampler’, and is marketed primarily as a live module. Although its similar in price to the MPC Touch, it’s a smaller and more portable machine, and its a standalone box too, so you could easily use it in a DJ booth without having to have a laptop with you.
You get 16 backlit pads and a bunch of other buttons, with four encoders at the top of the machine. In terms of the screen, the SP404A provides a basic ‘calculator-type’ 3 digit display. Samples get in via smart card (up to 32 gig – that’s like a couple of days of sampling time), via your computer or through either the mic or line inputs. You get 16-bit sampling with 29 of Roland’s superb DSP effects to play with as well, all of which can be adjusted from the front panel, so instant extreme sample mangling is easily attainable.
Aside from the standard delays and reverbs you also get a voice transformer – good for spooky robot voices – an isolater, a looper, tape echo, chorus, flanger, phaser, distortion, ring modulator, pitch, wah and more, and you can resample with effects too. It even comes with a built-in microphone and comes bundled with a quality sound library too.
The pads, although small, are responsive and most of the main functions are easily accessible, despite the limits of the display screen. In terms of looks and intuitive creativity, both the Touch and the Maschine MK3 (see below) edge ahead, but remember the SP404A can be used as a stand-alone sampler/sequencer which the other two can’t – and in terms of live sampling, looping and jamming, the 404A is very capable and enjoyable to use bit of kit.
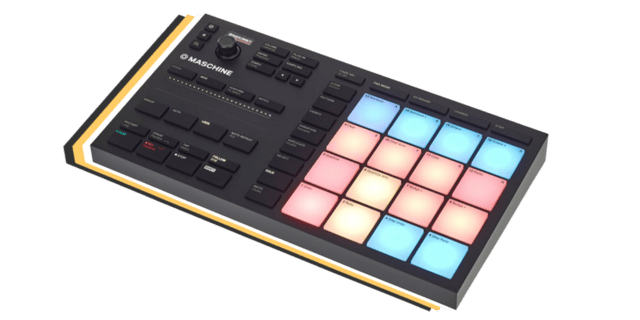
Native Instruments’ Maschine MK3
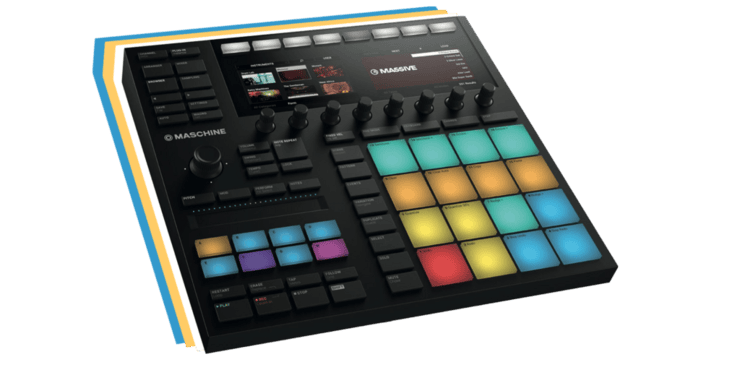
NI Maschine, in its original incarnation, originally hit the market in 2009 and was something of a game-changer at the time. The MK3 is an update of the original and provides the user with 16 great big pads, 8 smaller backlit pads, a row of eight encoders, one larger push-encoder and two high-resolution screens as well as a touch strip controller too. It’s a very sleek design, and the high res screens, although not as instantly rewarding as the touchscreen on the Touch, are a classy feature.
The audio ins and outs are on 1/4 inch jacks and you also get a mic in, MIDI in and out, USB and a pedal control input too. It can run on mains or powered via USB. Like the Touch, and unlike the SP404A, the MK3 is used in conjunction with your computer. It’s a great looking piece of kit, and along with its modern design, you get pristine 96kHz / 24-bit audio too.
It’s a good performance instrument as well as studio tool and one feature we were particularly impressed with is the ‘lock’ function which takes a snapshot of your production, enabling you to then tweak and twist to your heart’s desire before hitting lock again to return everything to where it was. Perfect for live jamming and for creating huge builds and breakdowns.
Maschine MK3 comes bundled with an 8GB sound library, as well as the 25GB Komplete 11 library collection, all of which should keep you occupied for a while. There’s also plenty of expansions to choose from and new ones being released regularly. Navigation around the menus and functions is smooth and the screens give you plenty of visual feedback too. The layout is well designed, providing plenty of opportunity for immediate improvisation and what NI call ‘classic groovebox workflow’. The MK3 has a particularly impressive build quality and overall its design is extremely sleek.
The next best options, such as the outstanding products from Elektron, other models from Akai, and Pioneer’s Toraiz, require quite a significant increase in budget. At this price point of around £500, it becomes more challenging to directly compare machines as apart from comparing functionality, each box also engenders a particular creative approach. Your choice of external sampler will be at least partly driven by how you like to work. If you need a standalone sampler that you can use independently, then the Roland SP404A is the one – it’s also the cheapest of the three samplers we looked at. It’s also likely that your choice will be swayed by the genre of music you’re making too – the SP-404 is a mainstay of lo-fi hip-hop producers, whist Maschine sees heavy use within the house and techno community. If you want to work with a DAW and your computer, then both the Touch and Maschine MK3 have a lot going for them. The Touch’s screen lends itself to creativity, and it’s a superb bit of kit for improvisation. Maschine is also a very capable and classy performance machine. In order to write this review, we went down to GAK, our local pro-audio shop, and played around with the various samplers – we would advise you do the same to find which workflow works best for you. Whichever choice you make, we can firmly recommend any of these three machines.
If you’re looking to spend a little less, please check out our recommendations for hardware samplers below £300 here.

Digital sampling using your DAW is pretty standard these days but it was only a few years ago that every studio in the land had at least one or two hardware samplers in their equipment rack. Now though, the sampling capabilities offered by DAWs are only limited by their user’s imaginations (and copyright laws of course), so why would anyone want to buy an external sampling box with the inevitable compromises that small bits of gear bring?
The answer only becomes clear once you physically try out a piece of hardware. There is still nothing that compares to jamming on a step sequencer, away from a computer screen, with a couple of encoders to tweak the filter and effects. It’s still one of the very best ways to come up with fresh ideas and its way more fun than fiddling with your trackpad or mouse. Working with a dedicated piece of hardware allows you to move away from visually fixating on the screen and the arrangement in front of you, and instead can facilitate the kind of intuitive, creative workflow that all producers desire. Jamming on a dedicated box creates a direct connection to the dance floor experience because you can ‘play’ it and move to the music, rather than operate it, which brings a physicality to the task that is hard to capture when sitting at a laptop. Dedicated external bits of kit also allow electronic producers to perform their work live, to improvise and create on the fly.
With this in mind, we present the first of our sampler reviews, looking at three of the best samplers on the market for under €300. Here are the contenders:
Korg Volca Sample
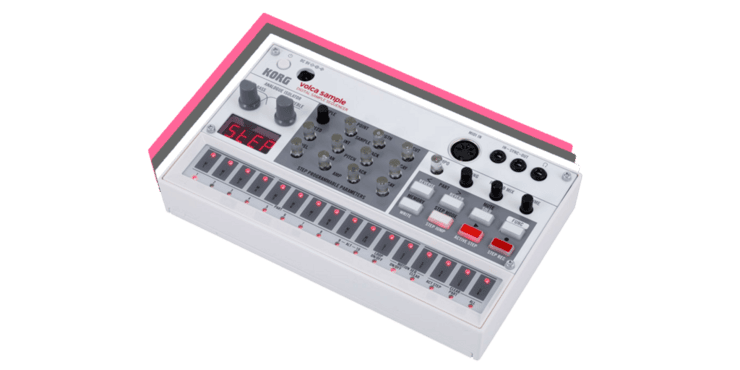
First up is the popular addition to the expanding Korg Volca family, the Korg Volca Sample, which is currently retailing for around £140. The Volca Sample is a small (it’s the size of a small book) but well-specced sample player with emphasis on live performance. It has no inbuilt sampling ability of its own, instead, you fill it with your own samples via either an iPhone or iPad. As with all the machines we’re looking at, the aim is to provide the user with as much tweakability from the front panel with minimum menu delving, to facilitate workflow. So you get a powerful 16 step sequencer, a bunch of tiny encoders to adjust various parameters and a basic ‘calculator’ LED screen to show parameter levels.
There are lots of decent sound manipulation possibilities, with accessible parameters for each of the Volca’s ten sample slots. You can instantly tweak the sample start point, playback speed, pitch envelope, level, pan, attack and decay, and samples can also be looped and reversed. This means that you can very quickly warp a sample beyond all recognition and opens up all sorts of creative avenues.
In terms of effects, you get a single perfectly usable reverb – but these kinds of limitations are always a bad thing. In addition to the step programmer, squashy little pads and diminutive pots, there are two larger ‘analogue isolators’ for bass and treble, which provide an instant EQ boost or cut, and which are the only analogue part of the otherwise entirely digital Volca. Best of all in terms of creativity is that just like on their classic Electribe range, you can easily slip into motion sequence mode and record all your tweaks to the sequencer.The sample rate is 32kHz / 16 bit and the output – a single 3.5 mm stereo mini-jack – is a little noisy, which all adds up to a pleasingly slightly crusty sound.
Build quality is slight, but sturdy enough for live work. The Volca Sample can run on either six AA batteries or with an (un-supplied) mains adaptor. Samples are loaded in via an iPad or iPhone but of all the machines we’re looking at here, the Volca has the smallest memory with only 4MB. This, along with the fact that step sequencing doesn’t exactly lend itself to melodic composition, may mean that the Volca may be best suited to drum programming and abstract non-musical elements / FX.
Obviously, at this price point, there are going to be compromises – the Volca comes with a tinny inbuilt speaker, but it doesn’t really do the machine justice. In terms of connectivity, it only comes with a MIDI in, no out or through which would have been useful. Likewise, a stereo 1/4 jack output would have been more desirable than the 3.5mm stereo out. Some may find the 4MB of sample memory limiting but this misses the point of a machine like this, which is all about instant performance, improvisation and the joy of creating. With the Volca Sample, Korg has managed to scale down a substantial amount of functions into a tiny, effective and fun package, with an impressive amount of audio manipulation and mangling possibilities.
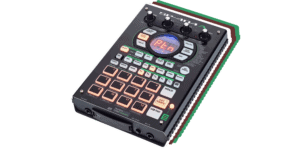
Akai MPX16
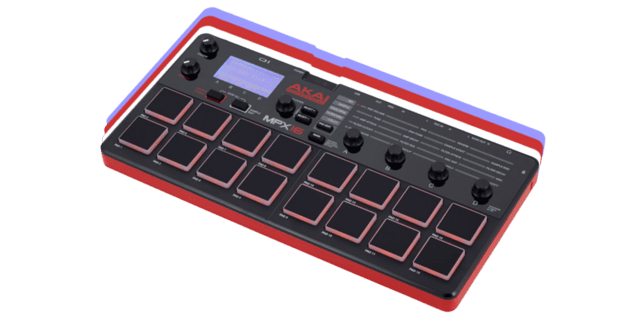 Retailing at around £160 the Akai MPX16 is described by Akai as a ‘compact sampling powerhouse’. It’s a great looking bit of kit, with 16 brightly coloured illuminated pads dominating the front panel. Samples are loaded via an SD card and you can load up to 48MB of your favourite samples at a time. The MPX16 will only play WAV files, but comes with drop and drag conversion software. You can also record samples via the stereo input or through the onboard mic.
In terms of connectivity, the MPX16 connects via USB, has both MIDI in and out, and is powered by either USB or mains – and the mains adaptor is supplied too – meaning you can use it independently of a computer. It’s also nice to see full sized 1/4 inch jacks on the stereo ins and outs too, and there’s also a headphone socket. Regarding the MPX16’s MIDI implementation, unfortunately, the encoders don’t send MIDI CCs so you can’t record live knob tweaks to your external sequencer.
When it comes to the all-important editing and mangling of your sounds, the MPX16 has four encoders on the front panel controls with a push-button matrix for selecting either tuning, pad groups, envelope control, panning, volume and of course filter cut off, resonance and envelope amount. Having four available knobs to tweak four available parameters means the MPX16 is particularly good for live jamming and improvisation.
Maximum polyphony is 64 voices; you can loop your samples and the MPX16 also features non-destructive editing, so you can chop up a loop into little pieces, keeping some parts and discarding others with ease. Akai samplers were always highly praised for their filters, and the MPX16 comes with resonant 24dB low pass filters on each of the 16 pads. There’s also a reverb that you can adjust for each individual sample. Sample tweaking is easy and accessible but if you do need to delve into the menu, the MPX16’s screen is a backlit LCD display rather than the ‘calculator’ screens that are prevalent at this price point.
The MPX16 also comes with a built-in stereo microphone for field recordings. This is a nice addition, but as ever with onboard mics, the one time that it might be really handy is if you’re out and about whereupon the mic’s sensitivity to physical movement and vibrations will be picked up and included in your recording.
The build quality feels durable and the MPX16 integrates with ease with DAWs. Drawbacks, however, would have to include the slow sample loading time, which might be a problem for live performers. Overall, it’s a great-looking little box, very well suited for live performance and jamming. Plenty of onboard tweakability and with those Akai filters, you can squelch up your sounds with ease.
Native Instruments Maschine Mikro MK2
Costing around £180, the Maschine Mikro is the priciest sampler we looked at. NI call it a ‘compact groove production studio’. It has substantially more functions than either the Volca or the MPX16, but can’t be used independently of your computer. What you get for your money is a cool looking little box with 16 enticing multicoloured lighted pads, a single encoder, lots of buttons and a decent backlit LCD screen. Best of all, it comes bundled with Maschine software and 6GB quality sounds, including 7000 one-shots, 400 loops, 300 drum kits and 388 sampled instruments. The Maschine software can run either under a DAW host or as a standalone, but you always need to use it in conjunction with a computer. An especially nice bonus is that the Mikro can host third-party plug-ins, which really opens up its potential.
Again, it’s a box that has been designed to withstand the rigours of live use and feels solid and sturdy. The number of onscreen buttons speeds up workflow and generally, the Mikro is intuitive and easy to use. There are no MIDI ports, all connections are through USB. Although the largest of the three samplers we’ve looked at, it’s still highly portable, is light and will slip into your laptop bag with ease.
The Mikro can claim to be a fully-fledged sampler rather than a sample player. It has 32 note polyphony and can sample at up to 24 bit 192kHz. However, if you prefer a more gritty approach, it can easily emulate older samplers like the MPC60 or SP1200. Unlike the other two boxes reviewed, it can take Rex files with ease. Perhaps the biggest factor in its favour (after the impressive bundled sounds and instruments) is the Mikro’s comprehensive effects section. It features 22 dedicated effects, including all the standard reverbs, delays and choruses, as well as more esoteric algorithms, and the potential for sound warping is huge.
The combination of pads, buttons, a decent LCD screen and a large single encoder means that again, this machine has been designed with jamming and improvisation in mind. It’s also great at looping and can split an audio loop by either transients, musical division or a number of equal parts and distribute it over the pads for instant remixing.
At this price point, the Mikro is a sleek looking and impressive option for live beat making and improvisation, as long as you don’t need a completely stand-alone device.
The Verdict
The availability of well-specced, intuitive sample players at this price point has been a welcome addition to many studios and these three boxes are all strong contenders for your live or home set up. Whilst the consumer will always have to pay to get more functions, each box reviewed undoubtedly has it’s own strengths and charms. Your opinion on the Volca will probably depend on whether you like using a step sequencer or not, although the addition of a little analogue processing might sway you too. The Maschine Mikro has the most functionality and features but requires a computer. The Akai has more features and memory than the Volca, and those Akai filters, but has less audio manipulation options than the Mikro.
For generating new ideas, composition on the fly and fully-fledged live performance, any of these three machines would provide you with plenty of opportunities to jam with your favourite samples and assist you in easily coming up with fresh ideas, and maybe even a chart-topping banger!